Home
Mission
Overview of Project
Project Staff
Sponsors
Achievements
Checking, Illustrations
Upcoming Activities
Id and Species Lists
Protea Information
Protea Gallery
Growing Proteas
Interim Dist. Maps
Publications
Afrikaanse Inligting
![]()
Using help and sending electronic data
 One
of the most exciting aspects of the Protea Atlas Project Sight Record Sheet Data Base is
the excellent Help features provided. For starters, the entire Protea Atlas Manual is
included within the Help files. Additionally, the latest codes and advice are also
included, as well as 10 years of experience. Then there is special information pertinent
to using the PAPSRSDB itself. All this information is very usefully packaged with
extensive cross-referencing and linking.
Help can be invoked in many ways. The most obvious is to select "Help" from the toolbar. This is in standard Windows Help format allowing you to access Help via the "Contents", "Index" and "Find" menus. "Help" also provides easy access to the Protea Atlas Project web pages, and information for contacting Nigel Forshaw and copyright information.
Far more useful is to position your cursor in the field that you require help in, and press F1 (Function 1 on the top line – the function line - of your keyboard, not the letter "F" and number "1" separately). This automatically invokes context-sensitive help and the appropriate help is opened for your perusal.
You will find the Help features on the PAPSRSDB particularly useful, and probably use them frequently as a reference manual to various aspects of atlassing.
Submitting electronic data to the PAP office
Using the "Help" menu will explain all the details of submitting your data electronically – simply "Find" any of "submit", "send", "electronic", "office", "file" or etc. and click on the obvious topic and the appropriate information will be displayed. However, if you prefer a paper version, but don’t want to waste the paper, this is for you.
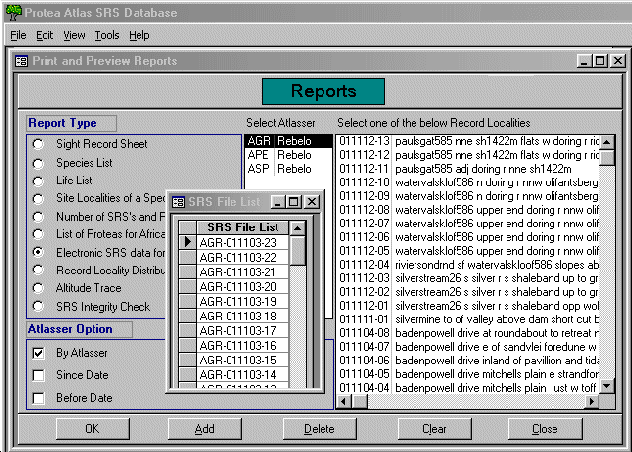
From the Main Screen select "Reports". A new window with a list of all the Reports available will open up. Select "Electronic SRS Data for PA Office" from the Report Type area. The screen should resemble that below.

The main components of the Reports Window are obvious. Note the black circle by the "Electronic SRS Data for PA Office", which was switched on when you selected this option. This is partly obscured by the "SRS File List" screen, that popped up when you selected the report type. The size and position of this screen may vary, and you can move it around or minimize/ resize/ switch it off as with any other window. In it is the list of SRS that are in the list from the last time that you used it (this feature will come in very handy shortly).
On the bottom bar of the Reports screen are the following options: OK, Add, Delete, Clear, Close. The middle three pertain to the "SRS File List". These are fairly self-explanatory – "Clear" clears the list, "Delete" removes any highlighted SRS from the list and "Add" adds selected SRS to the list.
The latter requires more explanation. You can select SRS in a variety of ways. You can restrict it to an atlasser in the "Select Atlasser" window. You can choose a SRS in the "Select one of the below" window. Or you can choose many SRS by using the "Since date" or "Before date" options. Selecting the date buttons allows you to type in the date (using day, month, year, separated with a "/", in the sequence you have chosen for your computer), or use a special pop-up calendar to select a date. (This calendar is also vary handy for finding dates – for example - of the third weekend in April of a year).
When you click "Add" you may get a message telling you that the SRS in the list already are submitted and must be cleared. If that is the case and you have already printed them, then press OK. If you have SRS with the status "Ready" (you will have set that in the Modify SRS Window after filling in the SRS, see PAN 51.14), then you will be asked if you want these added to the SRS File List. If you do, press OK.
If you want to see how many SRS you are about to send, press on the slide bar to the right of the SRS File List and the number will be displayed. This bar will only appear if there are more SRS than can be displayed in the SRS File List Window.
If you try doing something silly (like adding a SRS that is already on the list), then the computer will ask you if you really want to do it. Select an appropriate response. Most eventualities are catered for, so do not feel constrained in any way.
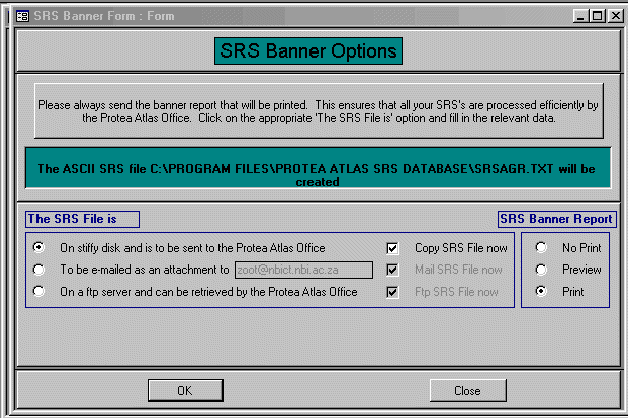
When your list is ready, select OK. A new screen (see opposite) is shown.

You can submit your data in three ways – select stiffy disc, e-mail or ftp-server depending on your preference. Choose whether to complete the action or to defer it by selecting the "Now" option or not. Please always select "SRS Banner Report" to print. When happy, press OK.
You will be asked if you want to change the status of the SRS being processed to "Submitted" – and this is strongly recommended – press "YES".
Your computer will now generate an ASCII file (a simple text file) in your database directory. The file is called either SRSxxx.DAT (where xxx is your Observer Code) or SRSALL.DAT if you selected more than one atlasser.
At the same time it will check each SRS for any error that it or you may have missed. It checks for new codes, inconsistencies between aliens and alien proteas, and various other database housekeeping tasks. Any errors are flashed up for your attention. You will be instructed to insert your stiffy for copying (if appropriate), and informed of the printing of the Banner Report (if selected). The computer will require you to press "Close" once everything is completed. This returns you to the "Electronic SRS Data" of the Reports Menu. Your SRS File List is probably obscuring the screen so minimize or close it by pressing on its resizing buttons, or move it out of the way by dragging it by its header bar.
Congratulations, you have sent your data to the Protea Atlas Office (you may have still to mail or take in your stiffy, but the hard work is done).
However, we will not process your data until we have obtained paper copies of your SRS. So there is still one task awaiting you.
In the Reports Menu select the top button "Sight Record Sheet." Two changes may occur on the screen. Firstly, the SRS File List will close if you did not do this manually. Secondly, two new options appear under "Atlasser option." The first option "Error Check" will be ticked. Leave it ticked, no harm will occur checking your data again. The second option "SRS File List" is your saving grace. If you have recently submitted your data, then the computer will still remember your SRS, even though their status is now "Submitted." Click on this box and all the SRS you need to print will now be automatically selected. Of course if you want to print other SRSs, you can do so by date (since, before), or by choosing a particular one (from "Select one of below").
Press "Print" and you are almost finished.
However, before you print, you may want to consider how you are going to print your SRS.
Some people like the neatness and professional look of the official Protea Atlas Project Sight Record Sheet form. Take your pad of SRS, remove the gum on the side and insert them into your printer. You will have to experiment with your page layout settings and this is rather finicky, but you will only have to sukkel once. Details of how to do this – this varies for different printers - are provided in the help file.
Alternatively, we are happy for you to submit your data on blank sheets of paper. The boxes (sections) of the SRS are drawn for you making an easy to read and print sheet.
To print on blank pages please go to the "Tools" command (top menu bar),
select "Options", and tick the "Print SRS on blank sheet of paper"
option. To make sure that the entire SRS will fit on the page proceed as follows:
Select "Preview" from the "Sight Record Sheet" option of the Report
Window. When the page is displayed, select "File" and then "Printer
setup." A "Page setup" menu will appear and you can change the settings for
the right and left margins. Unfortunately, you need to do this twice, once for a SRS with
less and once for more than 9 species. Note that the problem is the last character in the
Protea Present Box, the "planted" code. Even though the box prints, this last
letter often fails to print. You will have to play with your printer’s settings to
get this correct. When you close your preview you will be asked if you want to save your
settings. Please do so.
Please place your printed SRS underneath the "SRS Banner Report" and place them in an envelope to post or deliver to the Protea Atlas Project office. Please use your Banner Report to make sure that all the SRS have printed. The Banner Report will include the following additional information for both your and the office’s attention:
- Any 'X', 'XX', or 'XXX' codes that must be processed;
- Any new nature reserve, pollinator or species codes;
- Incomplete identifications (missing species/ subspecies);
- Null plots.
There are many advantages to submitting your data electronically. They include:
- Data entry costs are saved;
- Typing errors, checking & correcting are minimized;
- Errors & new codes are flagged for office attention;
- Filling in your SRS is a pleasure - quicker & interactive;
- Neatness and legibility is assured.
Currently, we only accept electronic data.
Tony Rebelo
Back PAN 53